Overview
Reminding users about items left in their shopping carts is one of the most effective ways to drive conversions and recover lost revenue. When implemented properly, abandoned cart campaigns deliver proven results as shown in our Case Studies. This step-by-step guide shows how to implement abandoned cart notifications with example code for two scenarios:- Using OneSignal’s powerful tagging and segmentation tools in a segment-based Journey.
- Using OneSignal’s comprehensive new Custom Events features and two simple event-triggered Journeys.
If you already have an abandoned cart solution setup, you can use our Data Feeds to sync cart data directly into your OneSignal messages.
Setup
1. Track cart activity with tags
Use tags to track when users add items to their cart. These tags can include product name, image, and a timestamp:cart_update: Unix timestamp of when the cart was updatedproduct_name: Human-readable product name for personalizationproduct_image: Direct URL to product image for visual engagement
If the user leaves your site without checking out (abandoning their cart), you
now have enough information to target them with a personalized abandoned cart
notification.
2. Create abandoned cart segment
Once the tagging setup is complete we’ll need to target these users and send them messages after some time has passed. In your OneSignal Dashboard, go to Audience > Segments.Segments allow for grouping subscriptions based on the data collected: 1 - if they have items in the cart and 2 - how long it has been since those items were left in the cart.This segment will include users that have items in their cart and have left the site or mobile app over 1 hour ago. The user adds an item to the cart, then leaves the app or site, 1 hour later they will be in this segment.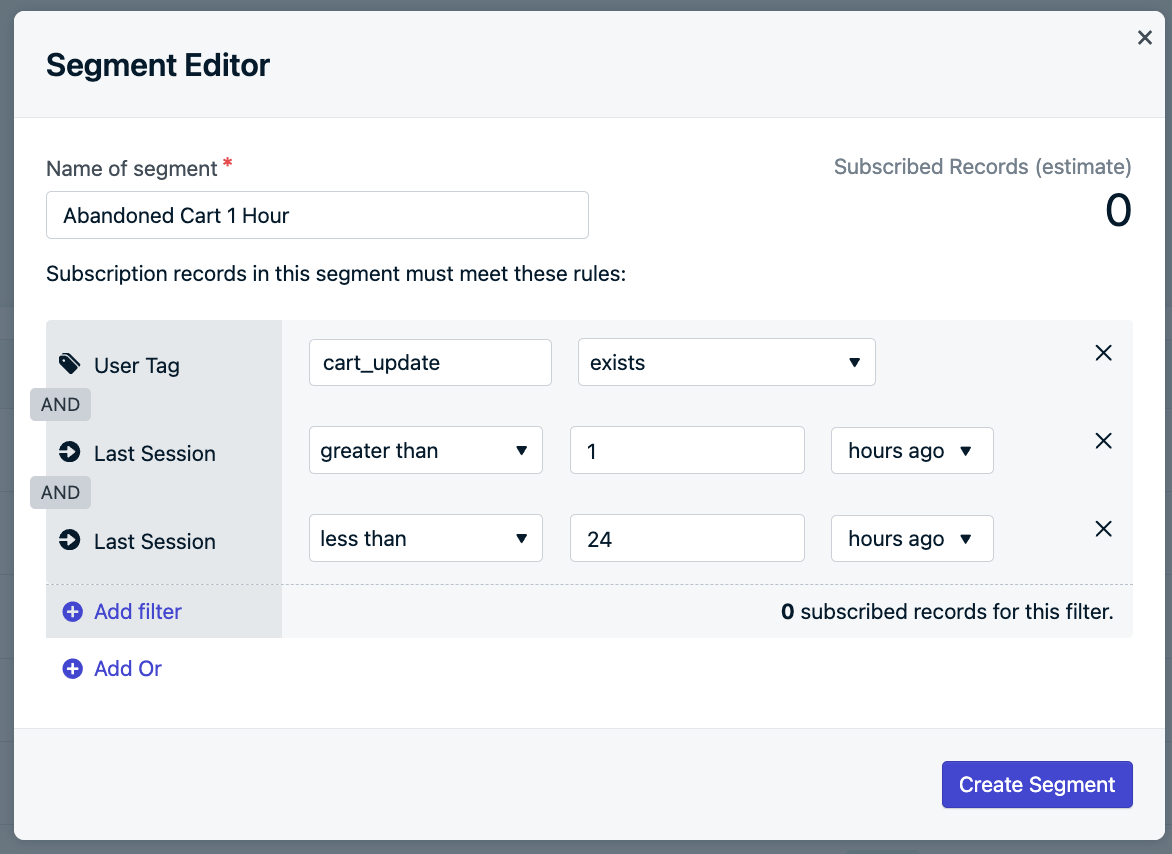
- Select the “User Tag” filter
- Set
cart_updateto “exists” - Select “Add Filter” to create an “AND” relationship.
- Select “Last Session” filter and set “greater than”
1. - Select “Add Filter” again and set another “Last Session” filter to “less than”
24. (the user will leave the segment after 24 hours). - Name the Segment Abandoned Cart 1 Hour (not required but helpful to remember).
Abandoned cart segment example
As users add/remove items from their cart and leave/return to the site, they will automatically move in and out of this segment.You can always come back into this segment later if you want to change the time frame from 1 hour to a higher timeframe.Segments can be duplicated to create more and setup different time frames if you want to send different messages after longer timeframes as well.
3. Create abandoned cart message
This is where we can use some creativity! If your site/app has certain phrases, language, or emojis you like, then use it! All that is great for brand recognition, get users to click, and getting them to checkout.Also, using theproduct_name and product_image tags, we can include this data within the message for Message Personalization.For example, we can say: “Hey Cool Cat 😸 ! Your new Yellow Cat Water Dish is waiting for you!”. And include the picture of the item in the message.In the OneSignal Dashboard, go to Messages > Templates and select “New Push Template”.Templates are a way to create reusable message and monitor how many times they have been sent and clicked.- Name the Template: Abandoned Cart 1 Hour or whatever you named the Segment.
- Add your Title, example:
Hey Cool Cat 😸 ! - Add your Message, example:
Your new {{product_name | default: "item"}} is waiting for you!
- here
{{product_name | default: "item"}}will be replaced by whatever value is set for that tag. If no tag is set than “item” will be used.
- Set the Image to be:
{{product_image}}
- here
{{product_image}}will be replaced with the URL of the image to the product. If tag value is not a direct link to the image, then it will not show.
- Set the Launch URL to be the URL of your checkout page
- here if the checkout page is unique per user, we would need to either link to the cart page (if not unique) or use more tag substitution. For example, if your checkout page is:
https://yoursite.com/username/checkoutwe need to tag the user with auser_nametag so their username can be replaced if we use:https://yoursite.com/{{user_name}}/checkout
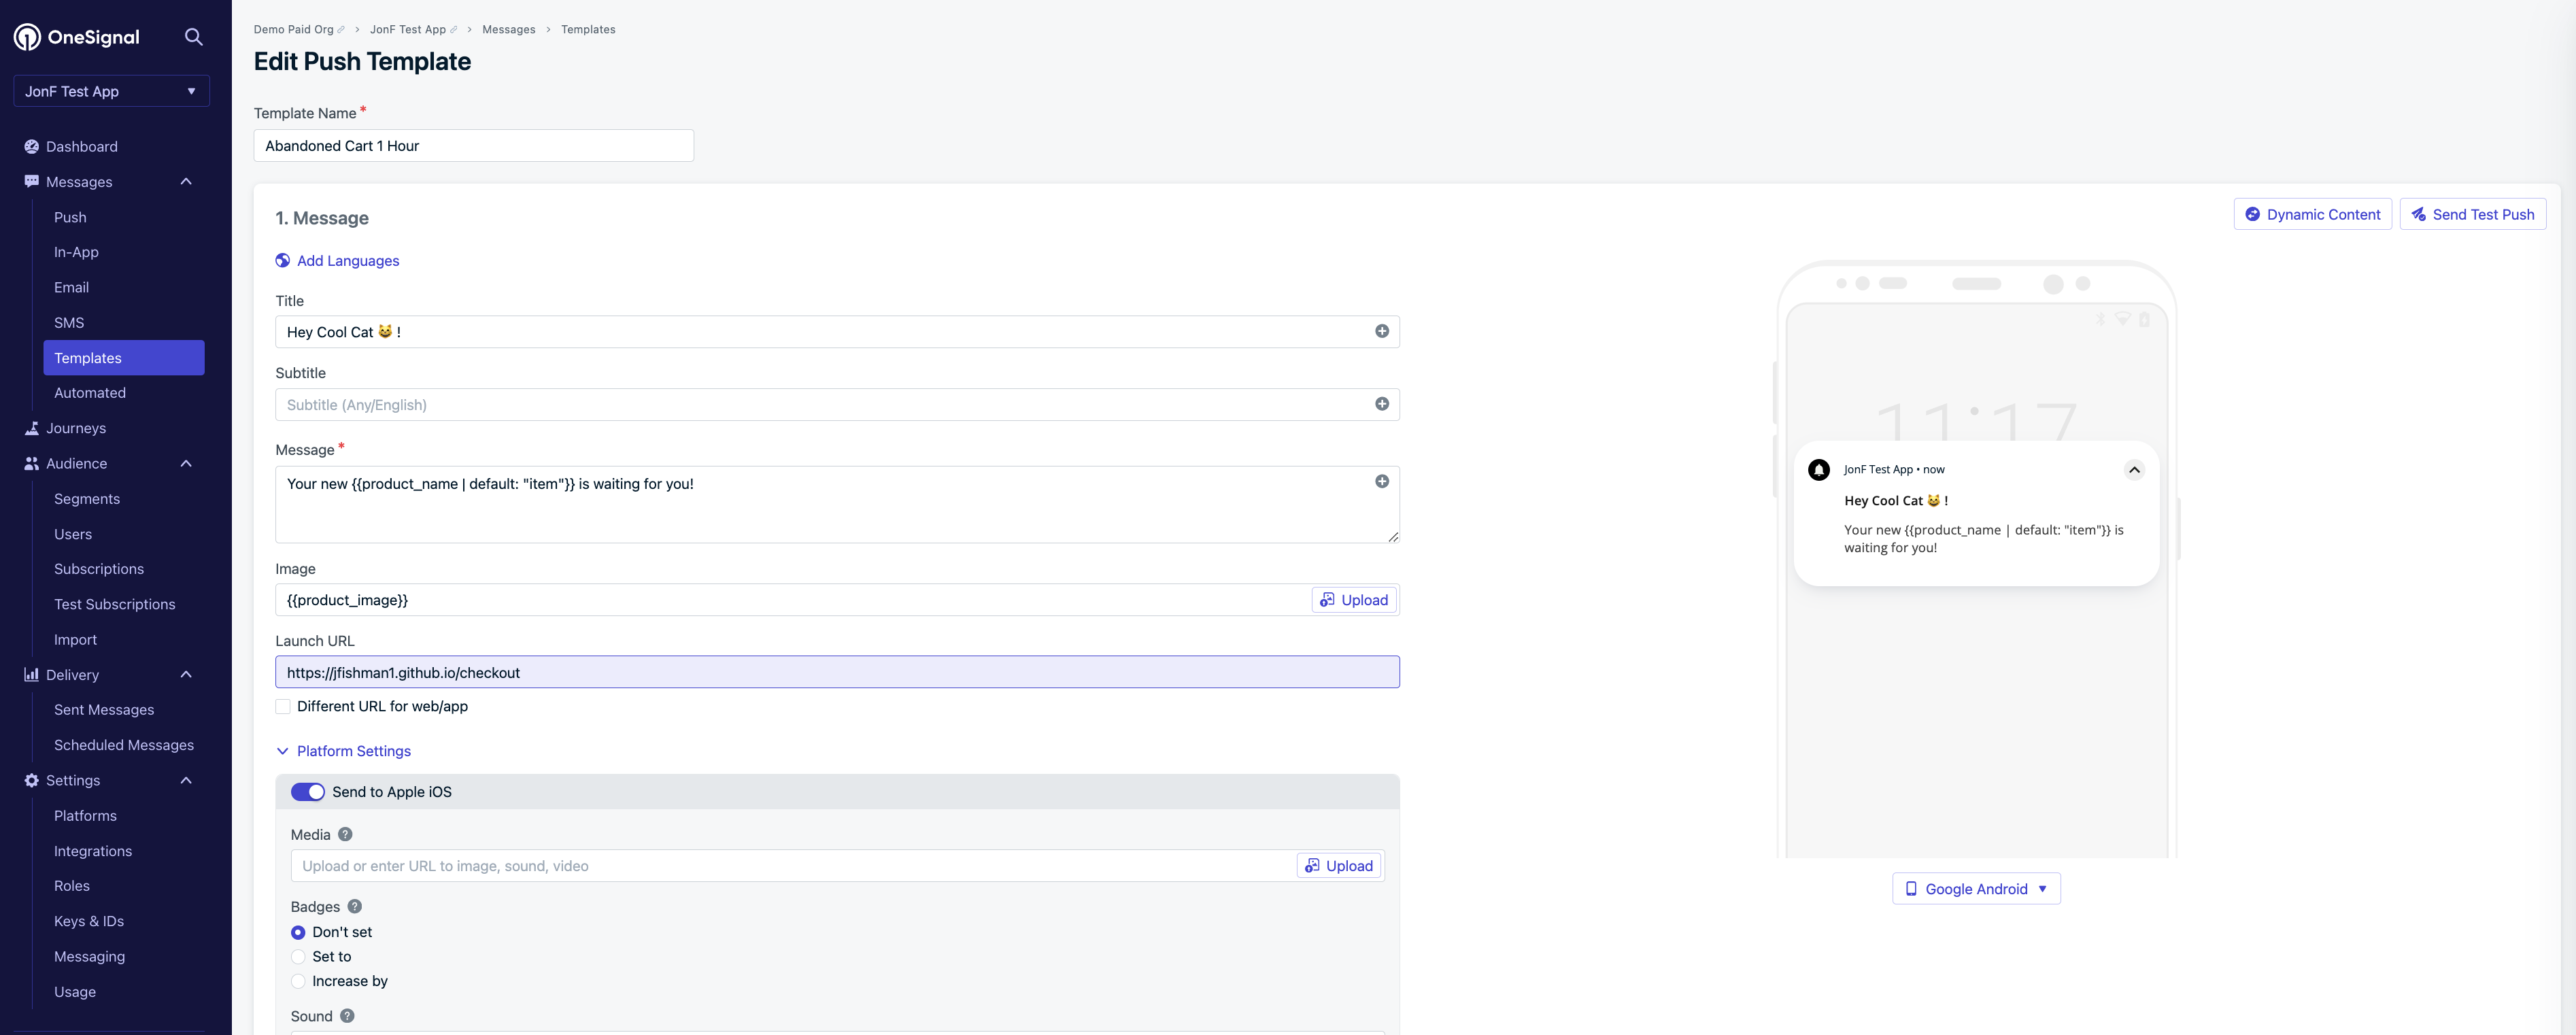
Abandoned cart message example
- Under the preview, click “Send Test Message” to test out how it looks!
- When done press “Save” at the bottom.
Now that our reusable template is setup, we can return to the Messages > Templates page to keep an eye on how many times this has been sent and opened.You can create as many templates as you want and across all the different channels you want to send from.
4. Setup abandoned cart journey
Navigate to Journeys > New Journey.Journey settings
- Name the Journey:
Abandoned Cartor anything you like to recognize what this Journey does. - Entry Rules: Include Segment Abandoned Cart 1 Hour segment.
- Exit Rules: Check Exit when a user no longer matches the audience conditions.
- Re-entry Rules: Select Yes, after a certain amount of time and set to
1Day.
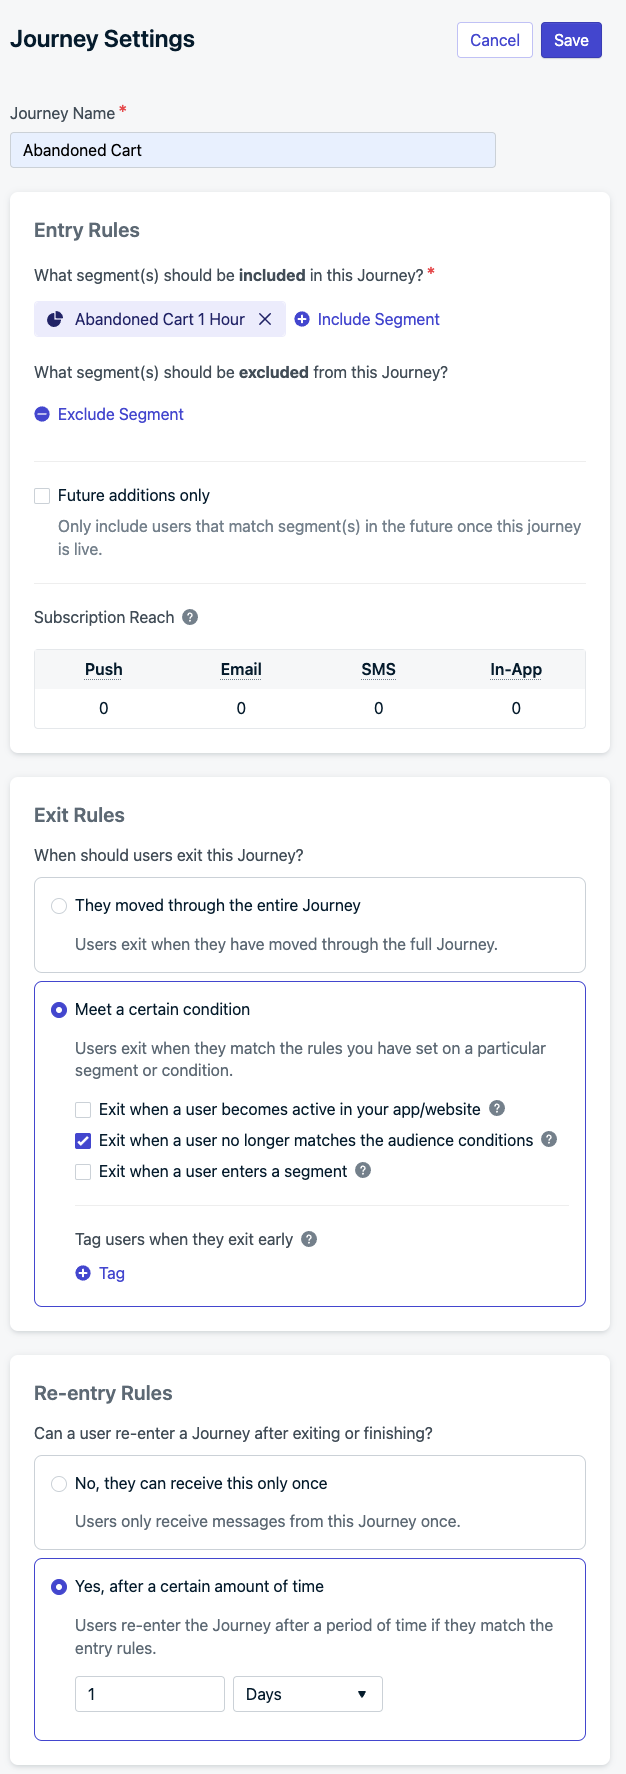
Journey settings example
- Press Save.
Journey steps
Currently users that enter the segment will then start flowing through the Journey. If they leave the segment, they will leave the Journey and can’t re-enter until 1 day has passed.- Add a Push Notification message step, select the Abandoned Cart 1 Hour template and Save.

Journey steps example
- Add a Wait step, select
1Week and Save. - Select Save & Close.
You have successfully finished the minimum Abandoned Cart setup! You can now create more templates, add more Journey steps, messages, and update as needed!When ready just press Set Live.
5. Optional setup abandoned cart performance tracking
Once abandoned cart message are set up, you can track how well it performs by going to Templates and looking at the open and click rates.If you have a Paid OneSignal Account, you can also use Outcomes to track actual revenue brought in.When the customer finishes payment, upon selection of the “Submit Payment” button call the following method.-
OneSignal.sendOutcome("Purchase", purchasePriceTotal);- will send OneSignal the total purchase amount and accumulate that revenue for all purchases made by all customers that clicked a push or received a push within a specific timeframe (influenced) and made the purchase. -
OneSignal.sendOutcome("Purchased Item Count", purchasedItemCount);- will send OneSignal the total amount of items purchased associated with the customer that directly clicked the push to make a purchase or made the purchase “influenced” by a push.
You are now an OneSignal expert! You achieved an in-depth implementation of
OneSignal’s offering and are ready to do more! Continue adding more best
practices outlined in our Use Cases or follow
the links below to go into more depth on these individual features.
Need help?Chat with our Support team or email
support@onesignal.comPlease include:- Details of the issue you’re experiencing and steps to reproduce if available
- Your OneSignal App ID
- The External ID or Subscription ID if applicable
- The URL to the message you tested in the OneSignal Dashboard if applicable
- Any relevant logs or error messages