Onboarding
| Journey setting | Description |
|---|---|
| Entry rules | User matches the segment criteria. Subscribed users, future additions only (you only want people who subscribe going forward; you don’t want existing users to receive this). |
| Exit rules | They moved through the entire journey. |
| Re-entry rules | No |
| Content | Welcome new users to your app or website; encourage them to accomplish certain tasks over the first several days or weeks. |
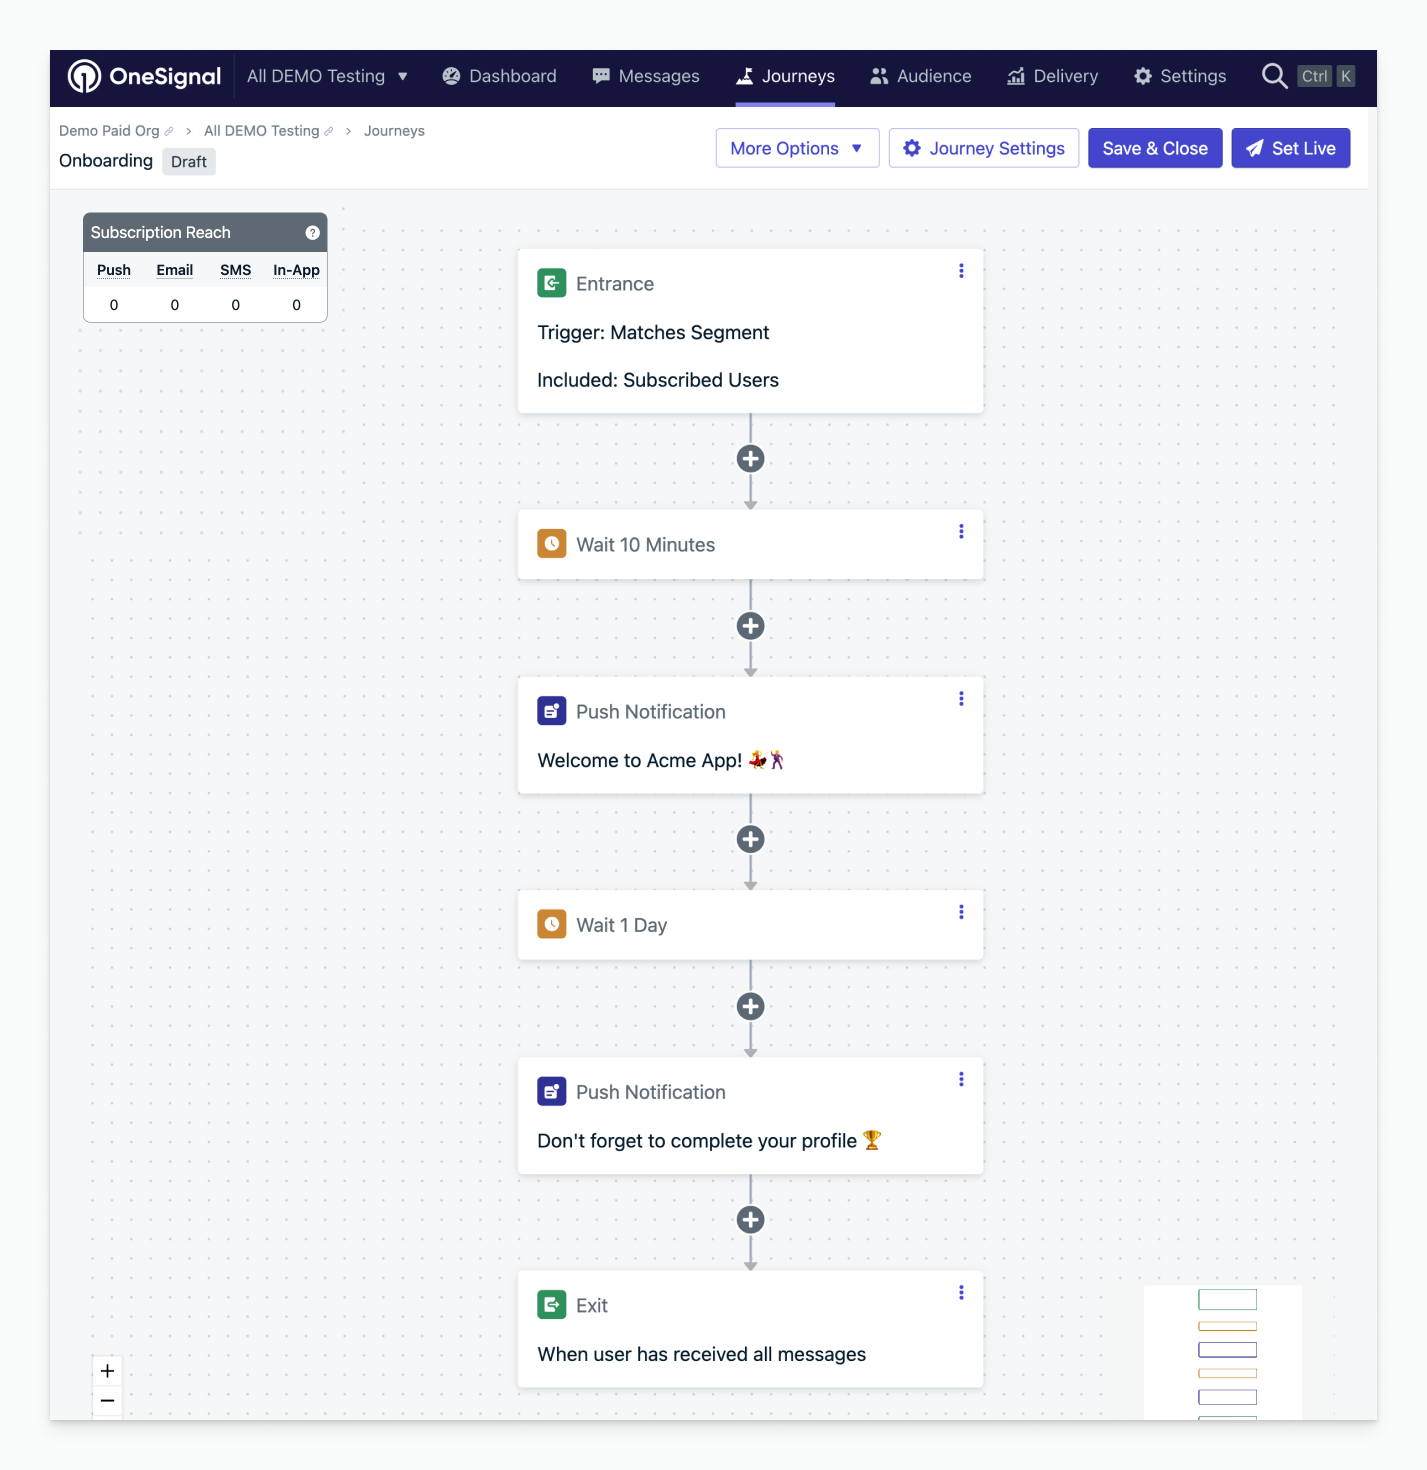
Onboarding welcome journey example
Re-engagement campaign
| Journey setting | Description |
|---|---|
| Entry rules | User’s last session is greater than 7 days; subscribed users. (You may want to exclude certain segments like paid customers if your goal is to get more free users coming back.) |
| Exit rules | They moved through the entire journey or meet certain conditions — exit when the user becomes active in your app/website. |
| Re-entry rules | Yes, after a certain amount of time: 7 days (re-engagement can happen whenever they haven’t opened your app in a while). |
| Content | Remind users to come back to your app when they haven’t opened it in a while, and entice them with rewards or discounts. |
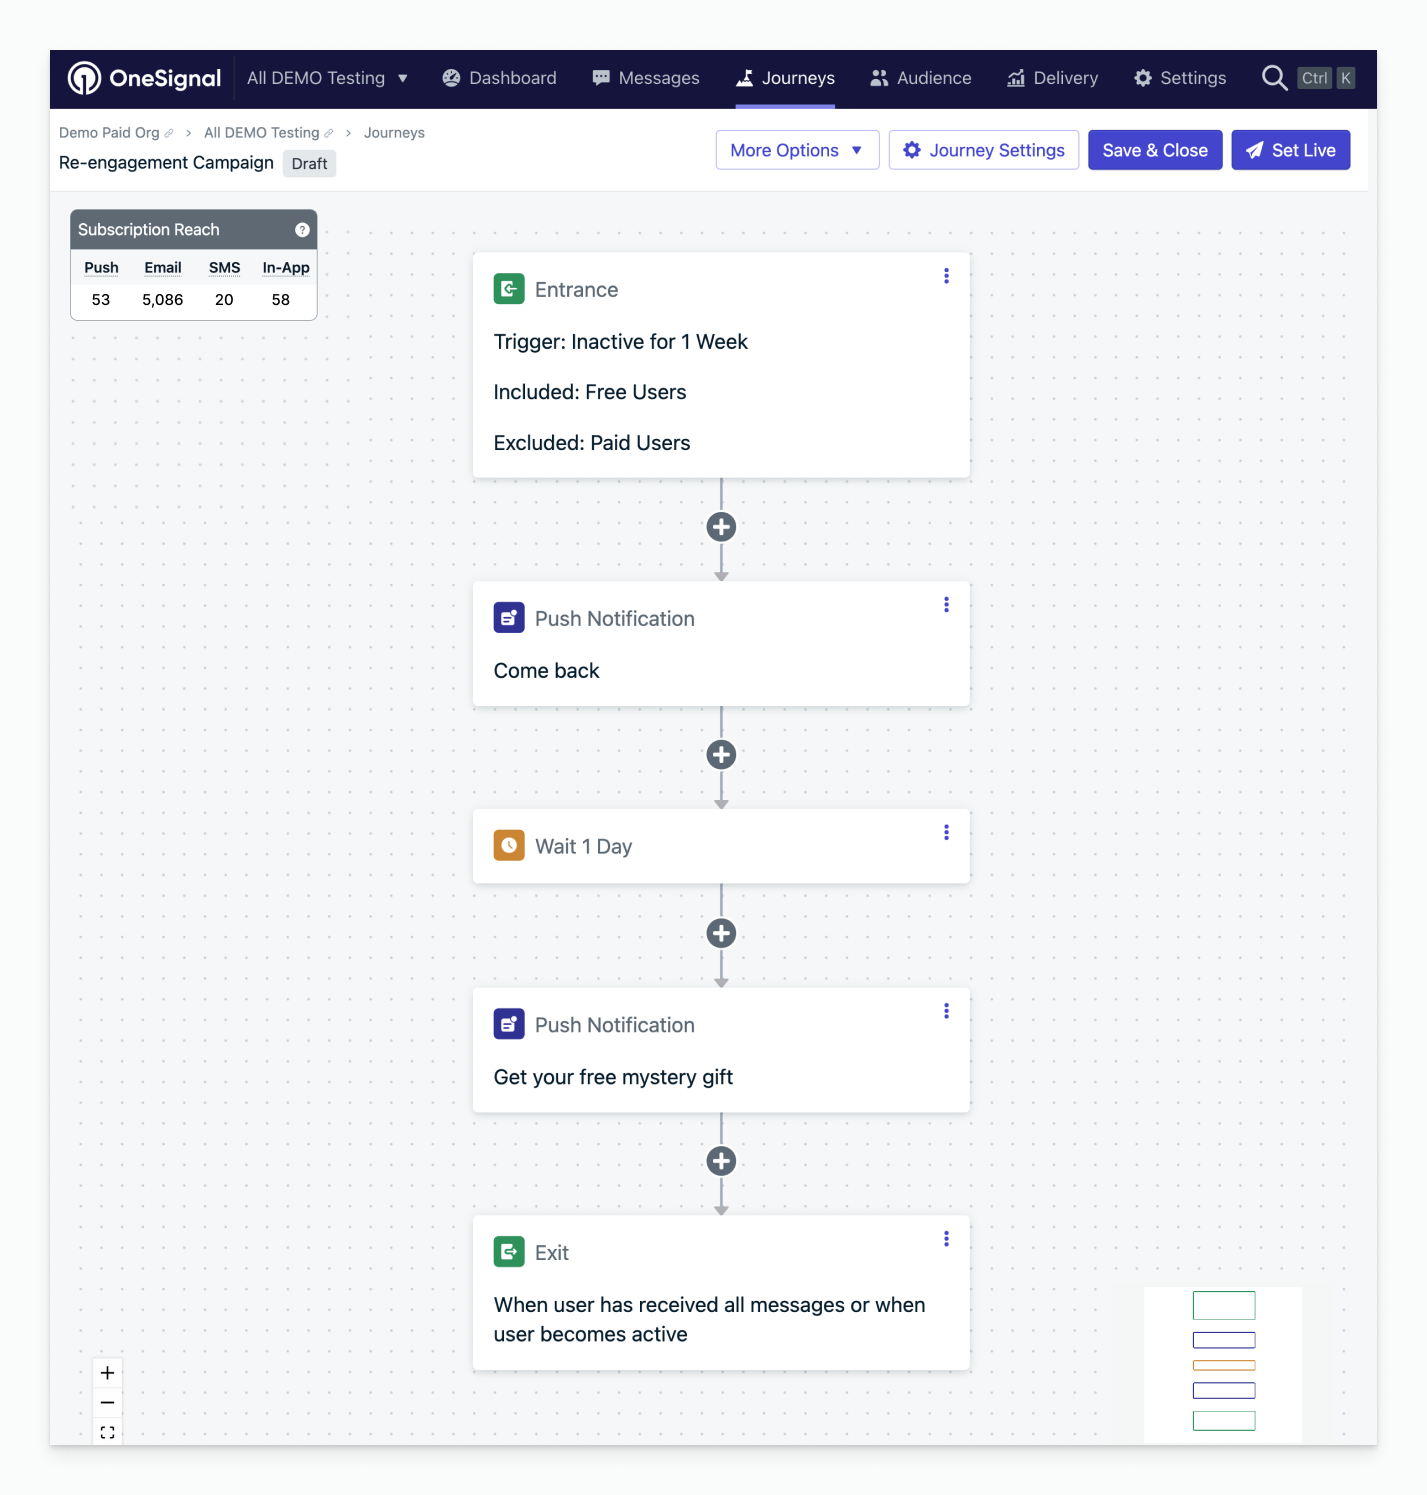
Re-engagement campaign journey example
Abandoned cart
| Journey setting | Description |
|---|---|
| Entry rules | User matches the segment criteria. Segment with a tag “cart_item,” and be sure to tag your users when they have items in their cart. |
| Exit rules | They moved through the entire journey or meet certain conditions. Exit when a user enters a segment where “cart_item” is empty (when a user completes their purchase, remove this tag). |
| Re-entry rules | Yes, after a certain amount of time: 1 day (you’re fine sending this once per day whenever they abandon their cart). |
| Content | Remind users to come back and purchase the item they didn’t complete checkout with. You might want different branches for categories or personas (e.g., whether they’ve purchased previously). |
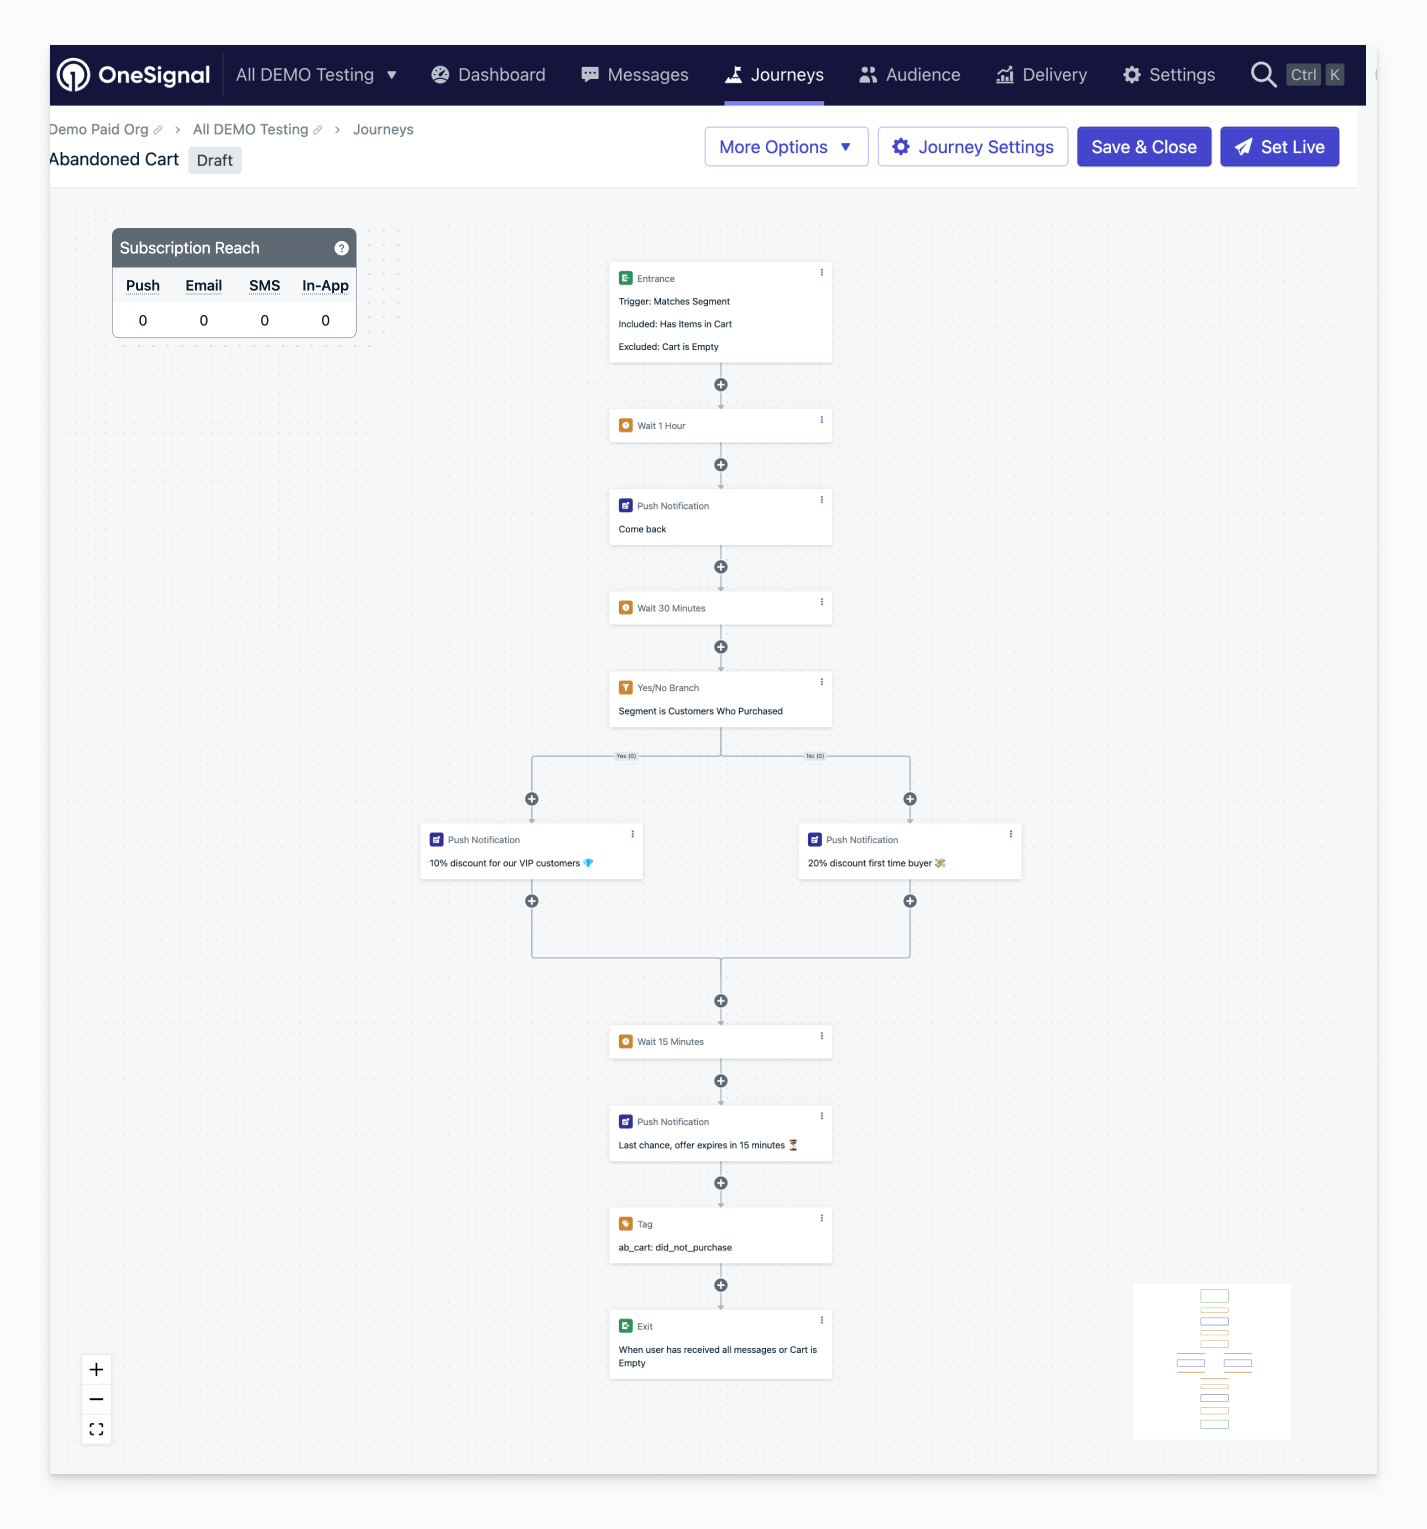
Abandoned cart journey example
Abandoned cart using custom events
support@onesignal.com with:- Your company name
- Your OneSignal organization ID
- The app ID(s) you want to enable
| Journey setting | Description |
|---|---|
| Entry rules | Custom event name is “cart_updated”, with one filter property: “cart.*.*” exists. |
| Exit rules | They moved through the entire journey or meet certain conditions: Exit when custom event condition occurs, custom event name is “cart_updated”. |
| Re-entry rules | Not applicable to event-triggered journeys. |
| Content | Remind users to come back and purchase the item they didn’t complete checkout with. You might want branches for different item categories or personas. See the custom event Liquid syntax tutorial for a guide to personalizing your messages. |
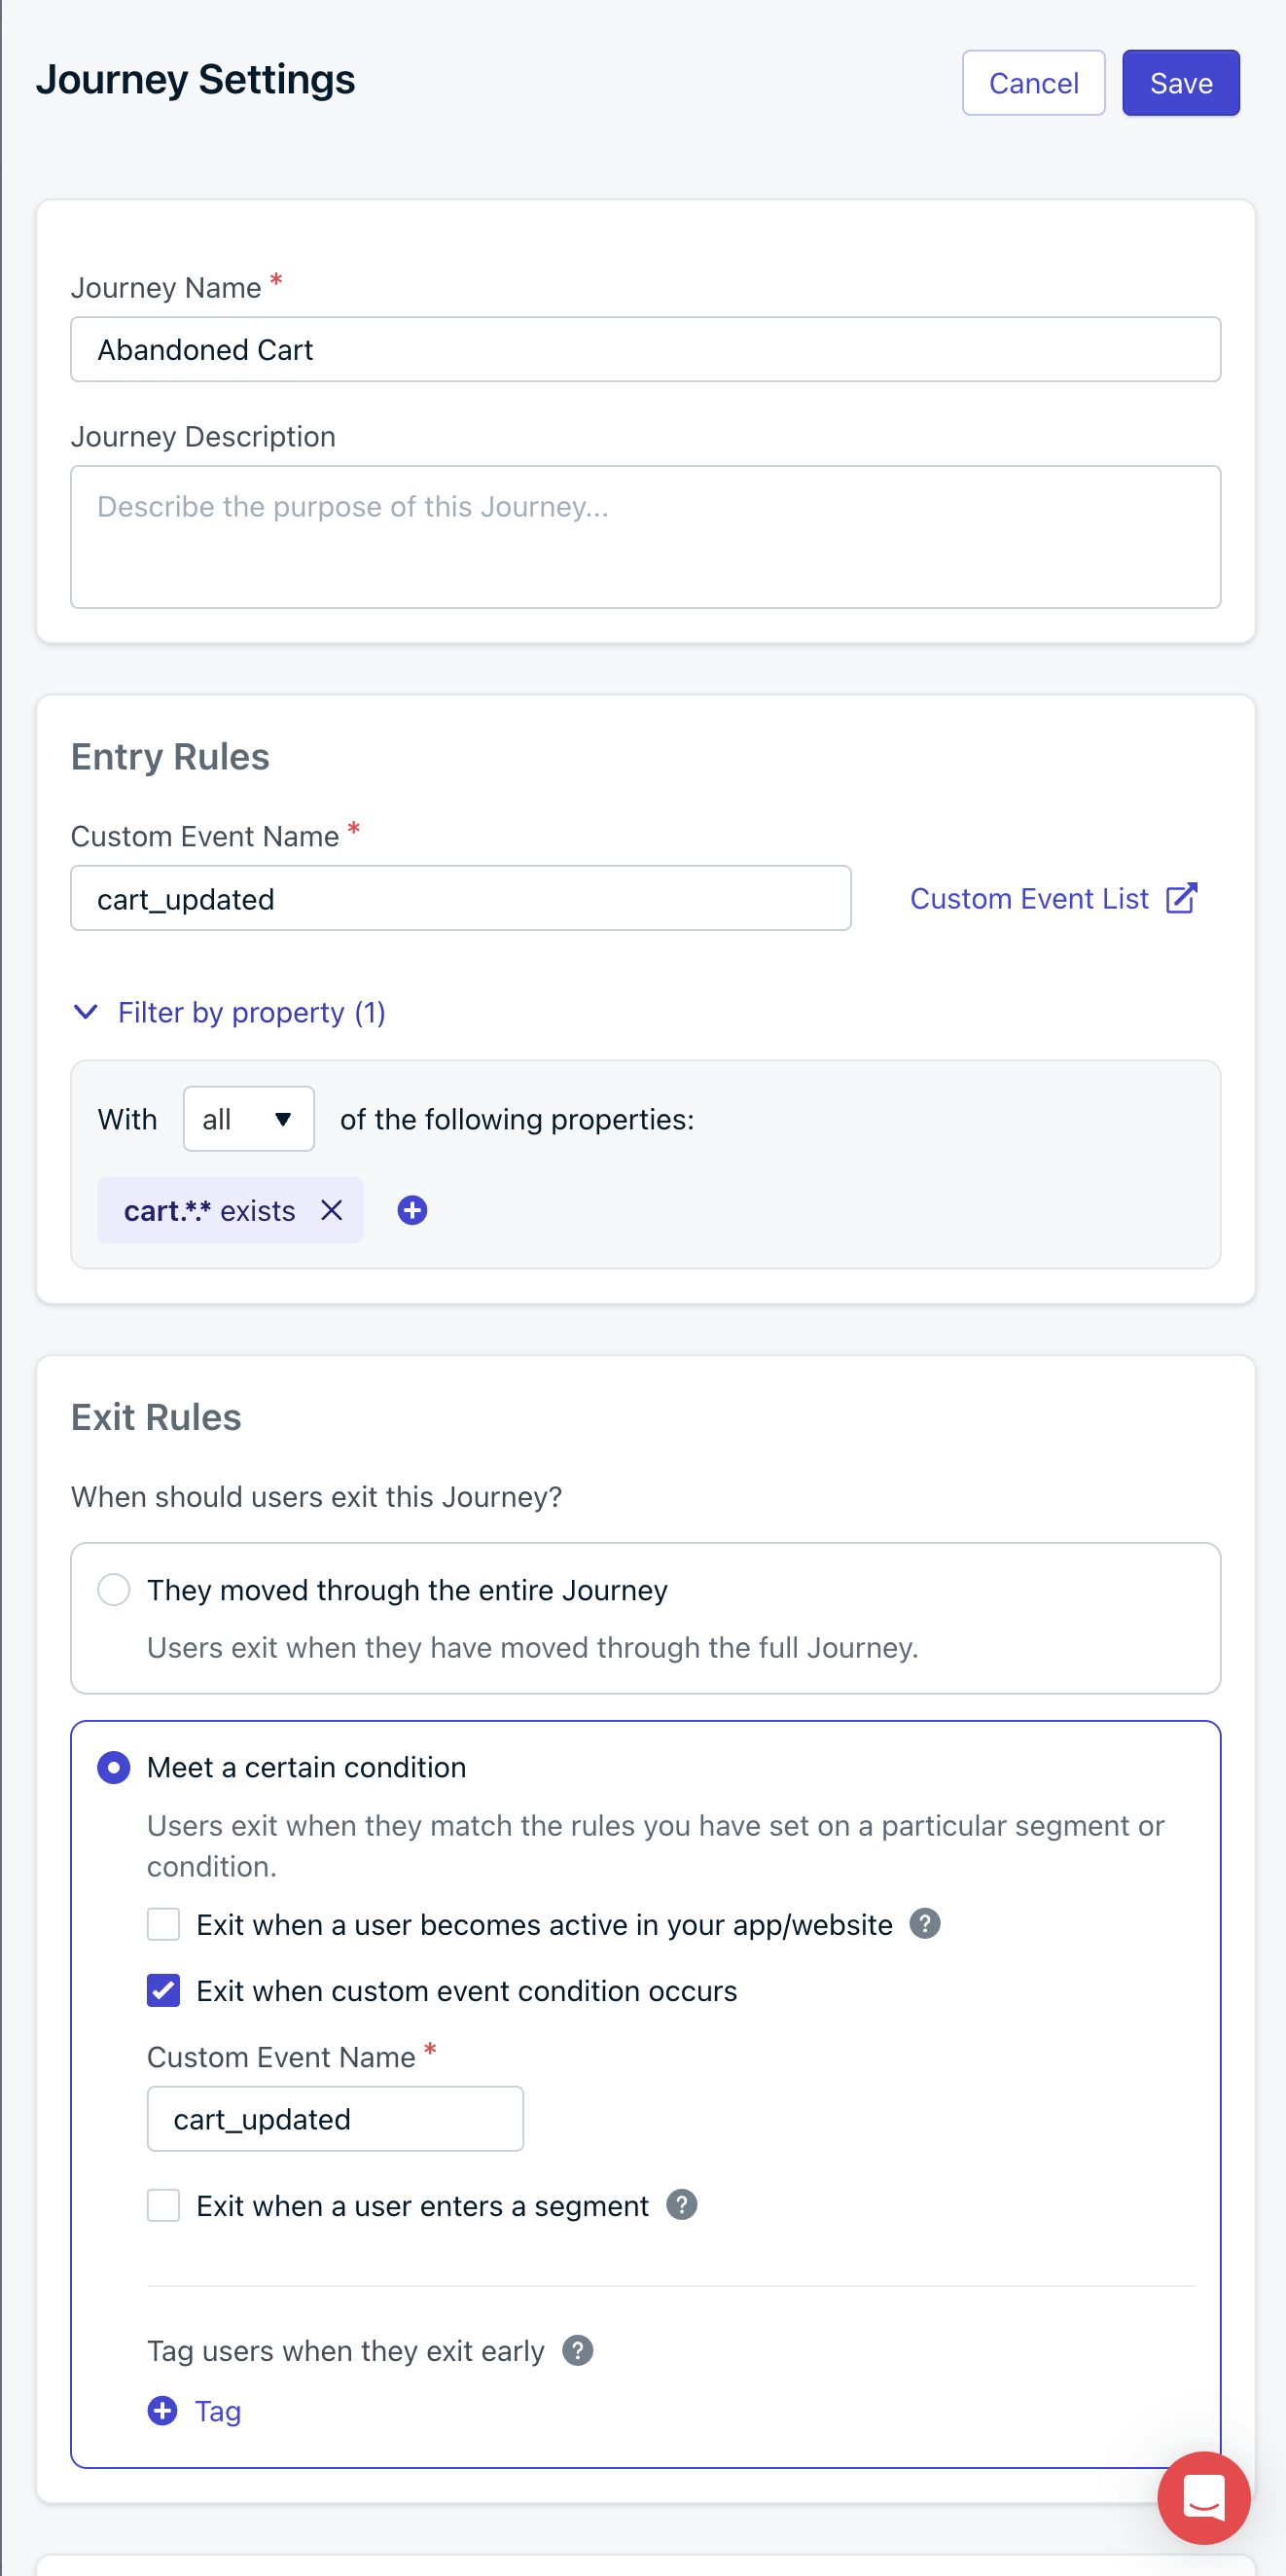
Abandoned cart event-triggered journey example
Promotional campaign
| Journey setting | Description |
|---|---|
| Entry rules | User matches the segment criteria. Subscribed users or target the segment your promotional campaign is relevant to. |
| Exit rules | They moved through the entire journey or meet certain conditions. Select a segment that defines the goal you want to target (e.g., users who purchased). |
| Re-entry rules | No (if this is a one-off campaign, send it once). |
| Content | Prepare them for the event, remind them when it starts, and offer a discount or reward as it gets close to ending. |
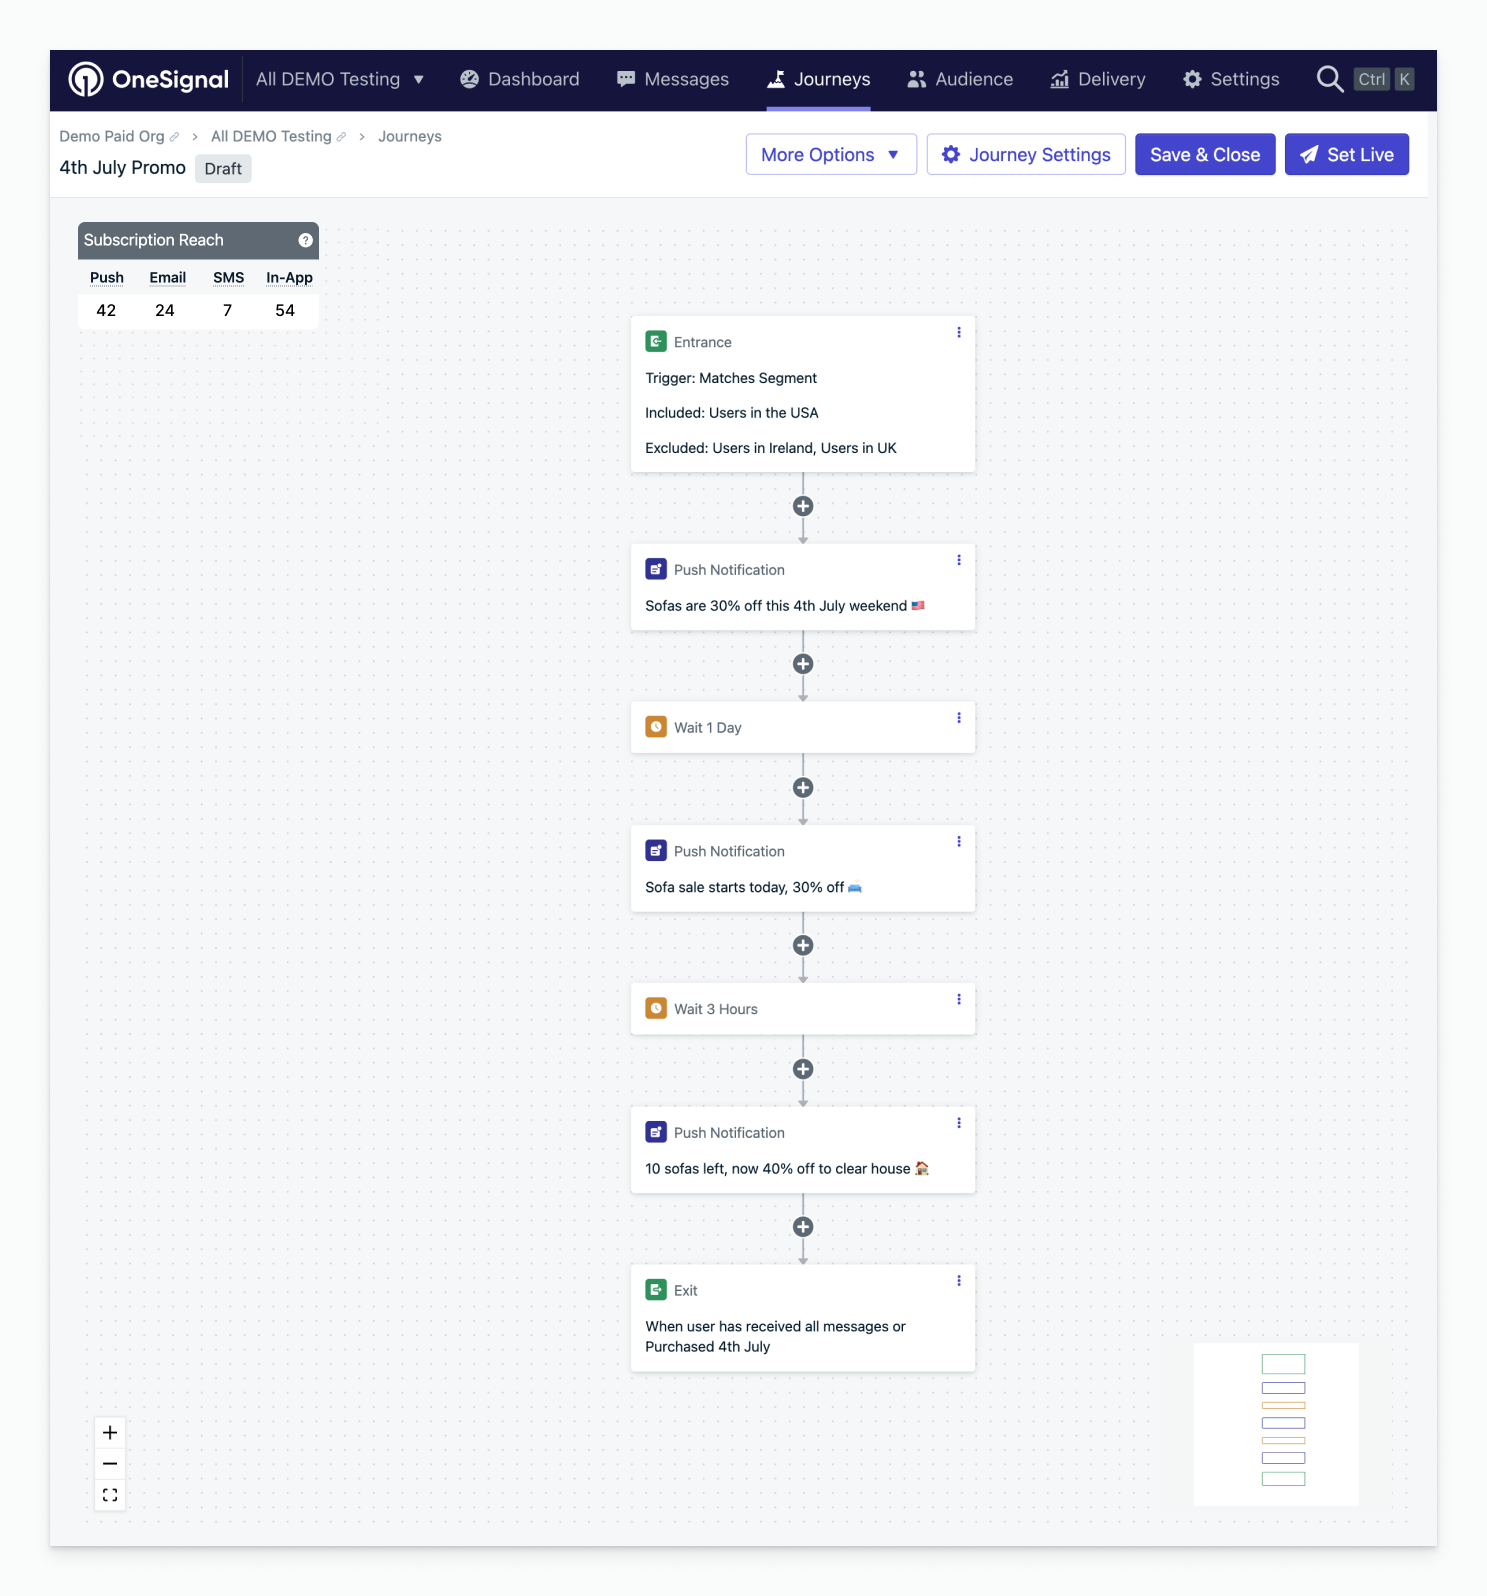
Promotional campaign journey example
Send message after user leaves app if action incomplete
Initial setup
- Use data tags to mark that the action needs to be performed by the user. Remove the tag when the action is completed.
- Set up the segment for this tag.
| Journey setting | Option | Description |
|---|---|---|
| Entry rules | The user’s last session is greater than the amount of time. | The amount of time you determine the user has been last active on your app or website. |
| Audience | Include the segment you want to target with the tag. | These are the users eligible to receive the message. |
| Exit rules | Exit when the user no longer matches the audience conditions. | When the user leaves the segment, they are no longer eligible for the journey message. |
| Re-entry rules | Yes, after a certain amount of time. | The amount of time you want to wait for the user to be eligible to get the message again. |
Journey steps
Add the desired message(s)
Set a wait node for the amount of time you want the user to wait
A/B test within a journey
Using a split branch node, you can set a 50/50 split within your journey. Create two different message templates and as your users flow through, half will get “Template A” and the other “Template B”. You can then export your message data to check the analytics as desired.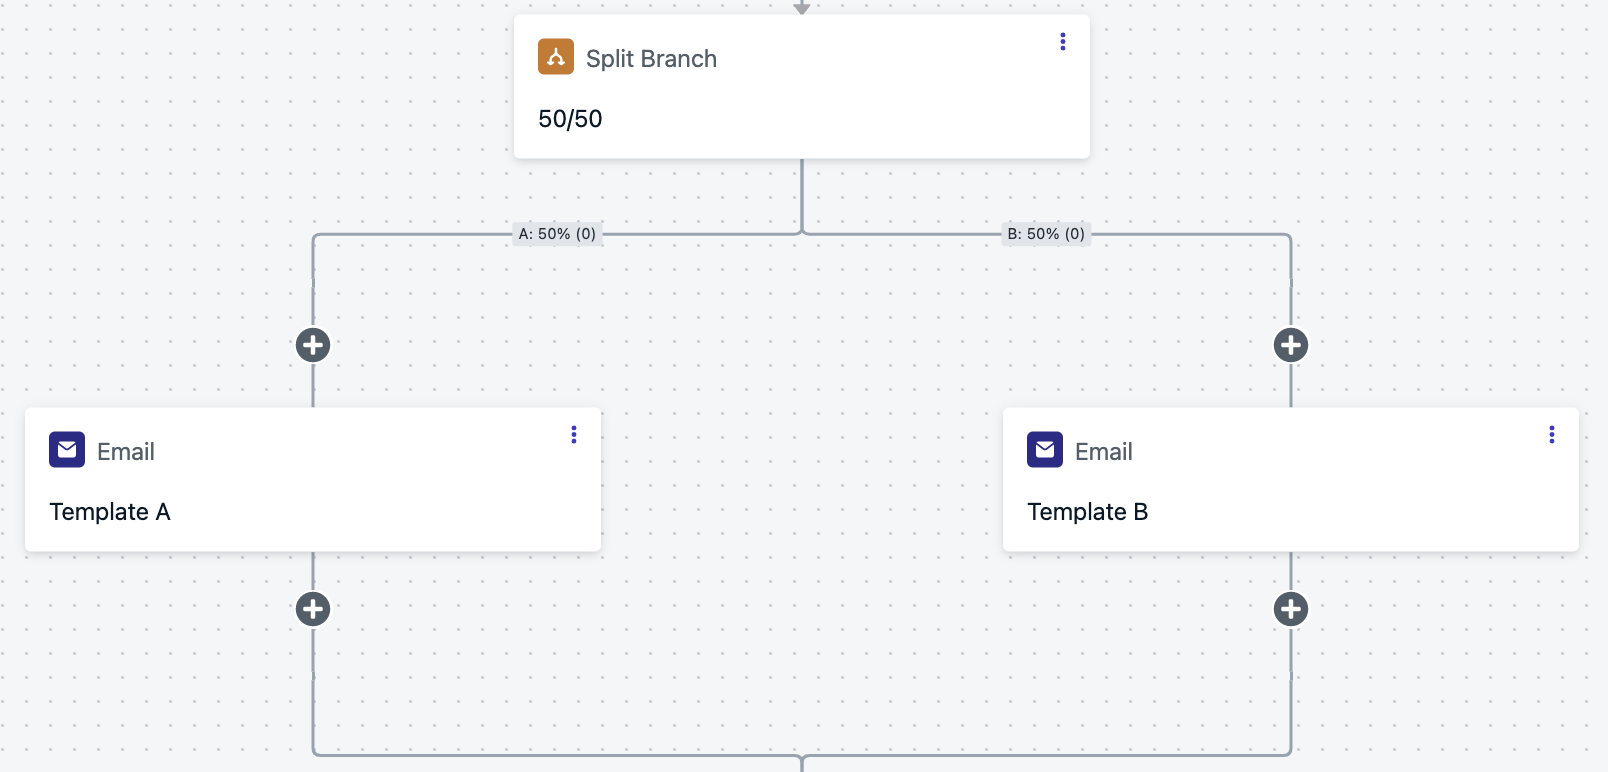
An A/B test
Display in-app messages in order and once per day
In this example, we want to display 3+ in-app messages in a row, but only show them once per day. If a user doesn’t open the app, they will still see it next time they open the app.Initial setup
Create a new segment
iam_journey with filter: User Tag iam_journey is 1- You can change
iam_journeyto whatever name you choose. - This tag will be set on each user that finishes the journey and gets all messages.
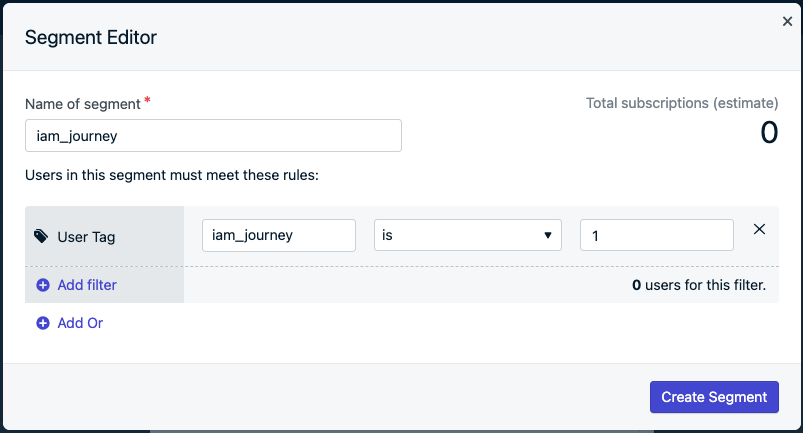
Segment creation screen
Create the in-app messages
Set up the following journey
| Journey setting | Option | Description |
|---|---|---|
| Entry rules | User matches the segment criteria | These are the users eligible to receive the message. |
| Audience | Include segment & exclude segment | Include the “Subscribed Users” segment. Exclude the “iam_journey” segment from step 1. |
| Exit rules | They moved through the entire journey | No additional conditions necessary. |
| Re-entry rules | Yes, after a certain amount of time | 2 minutes |
Journey steps
Repeat this order for the number of messages you want to display. In this example, we will display 3 in-app messages (IAM 1, IAM 2, IAM 3).-
Add an in-app message step.
- Name the message, for example:
IAM 1. - At the bottom of the message, set delivery schedule to 1 day.
- Name the message, for example:
-
Add a yes/no branch action before the in-app message step.
- Set your branching condition: previous message behavior: “
IAM 1viewed”. - Follow the No branch
- Drag the
IAM 1to the No branch. - Add a wait step for 1 day.
- Drag the
- Follow the Yes branch
- Within the Yes branch, repeat steps 1 & 2 for all messages, replacing
IAM 1with the new in-app message (e.g.,IAM 2,IAM 3). - At the final Yes branch, add tag user action.
- Tag the same key used in Initial setup → Step 1 segment.
- Example
iam_journey : 1.
- Example
- Tag the same key used in Initial setup → Step 1 segment.
- Within the Yes branch, repeat steps 1 & 2 for all messages, replacing
- Set your branching condition: previous message behavior: “
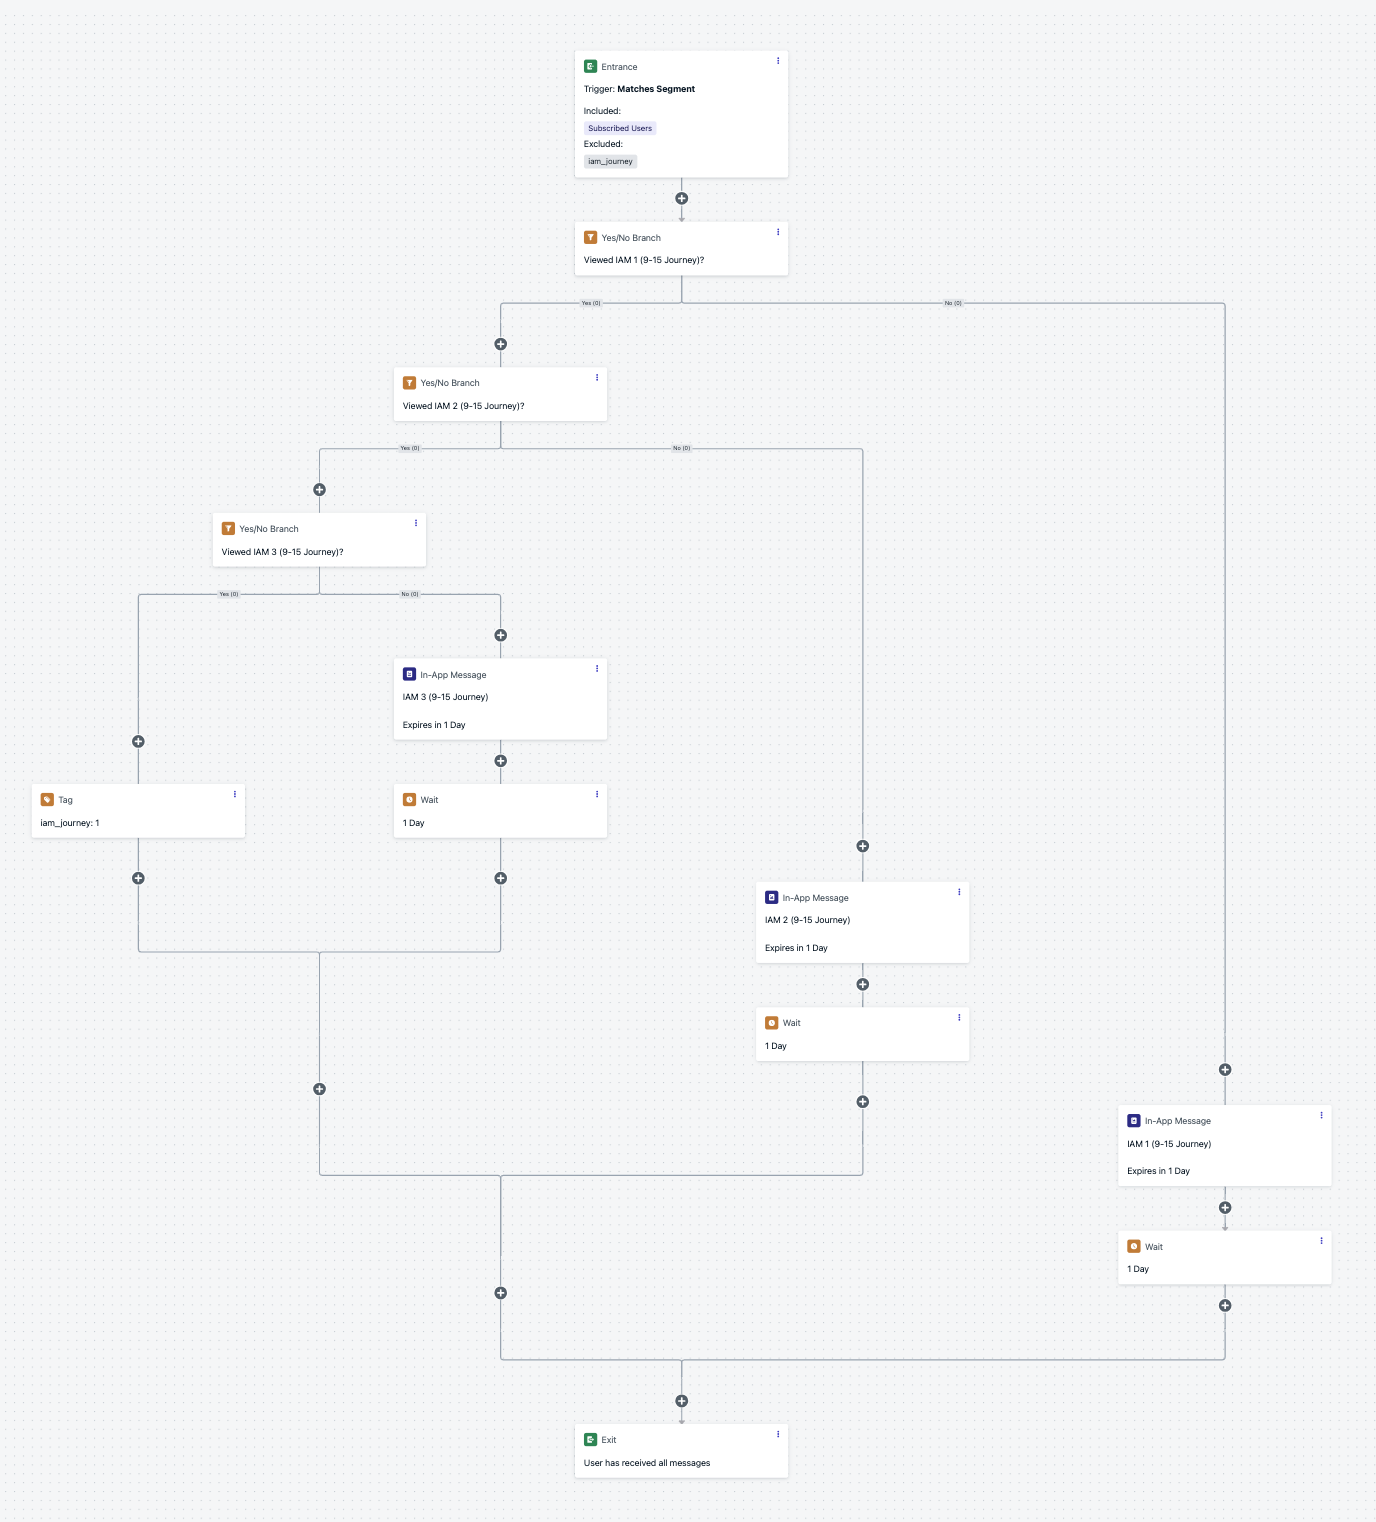
The complete journey
Limited entry journey
Ensure users can only enter a journey a limited number of times while controlling the experience at each stage.| Journey setting | Description |
|---|---|
| Entry rules | User matches the segment criteria (for example, subscribed users or any relevant target segment). |
| Audience | Include your target segment. Exclude users with the tag journey_count = 2 to cap entries at two times. |
| Exit rules | They moved through the entire journey. |
| Re-entry rules | Yes, after a certain amount of time: 15 days. |
| Content | Provide a first-time experience on initial entry, and a tailored second-time experience on re-entry. Prevent any further entries beyond the second. |
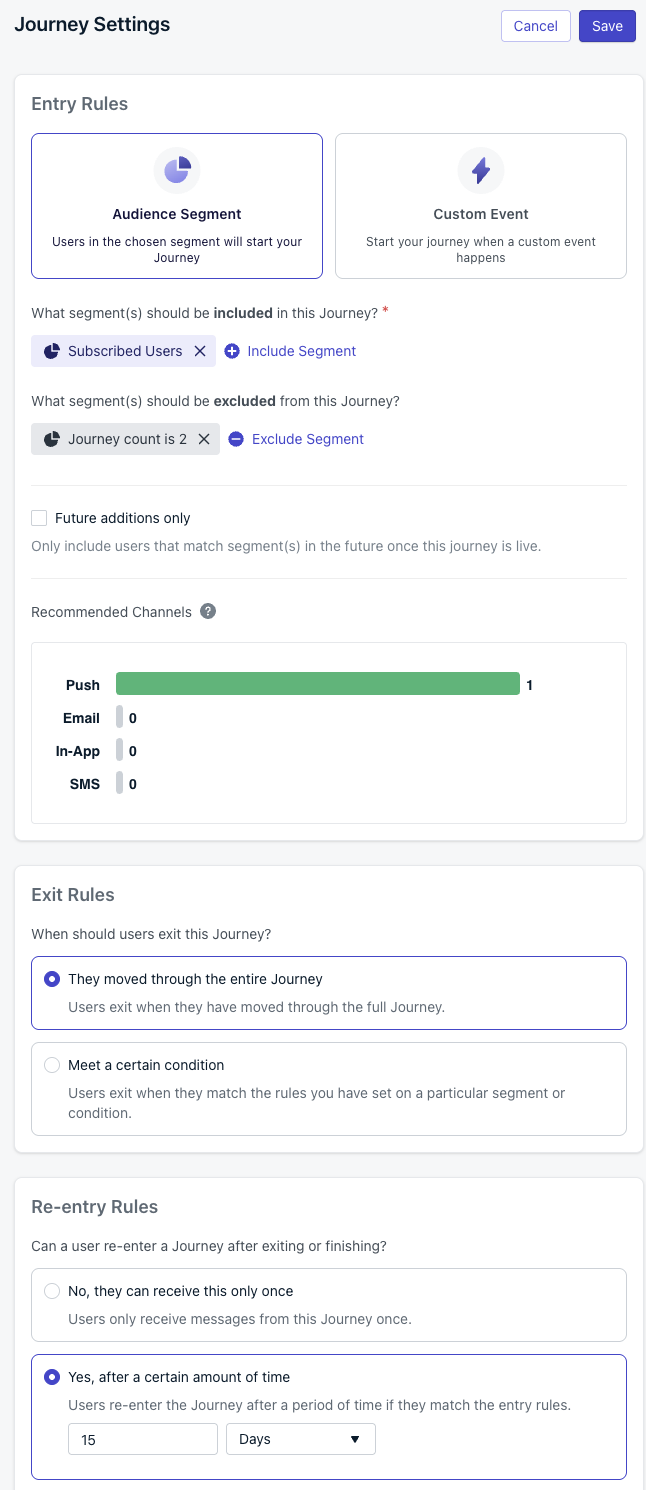
Limited entry settings
Initial setup
Prepare your tag strategy
journey_count to track entries.You don’t need to pre-create tags; they’ll be added when you set them in the journey.
See tag action for details.
Configure audience include/exclude
- Include your target segment (for example, “Subscribed Users”).
- Exclude users where user tag
journey_countis2.
Set re-entry rules
This allows exactly one re-entry between the first and second runs.
Journey steps
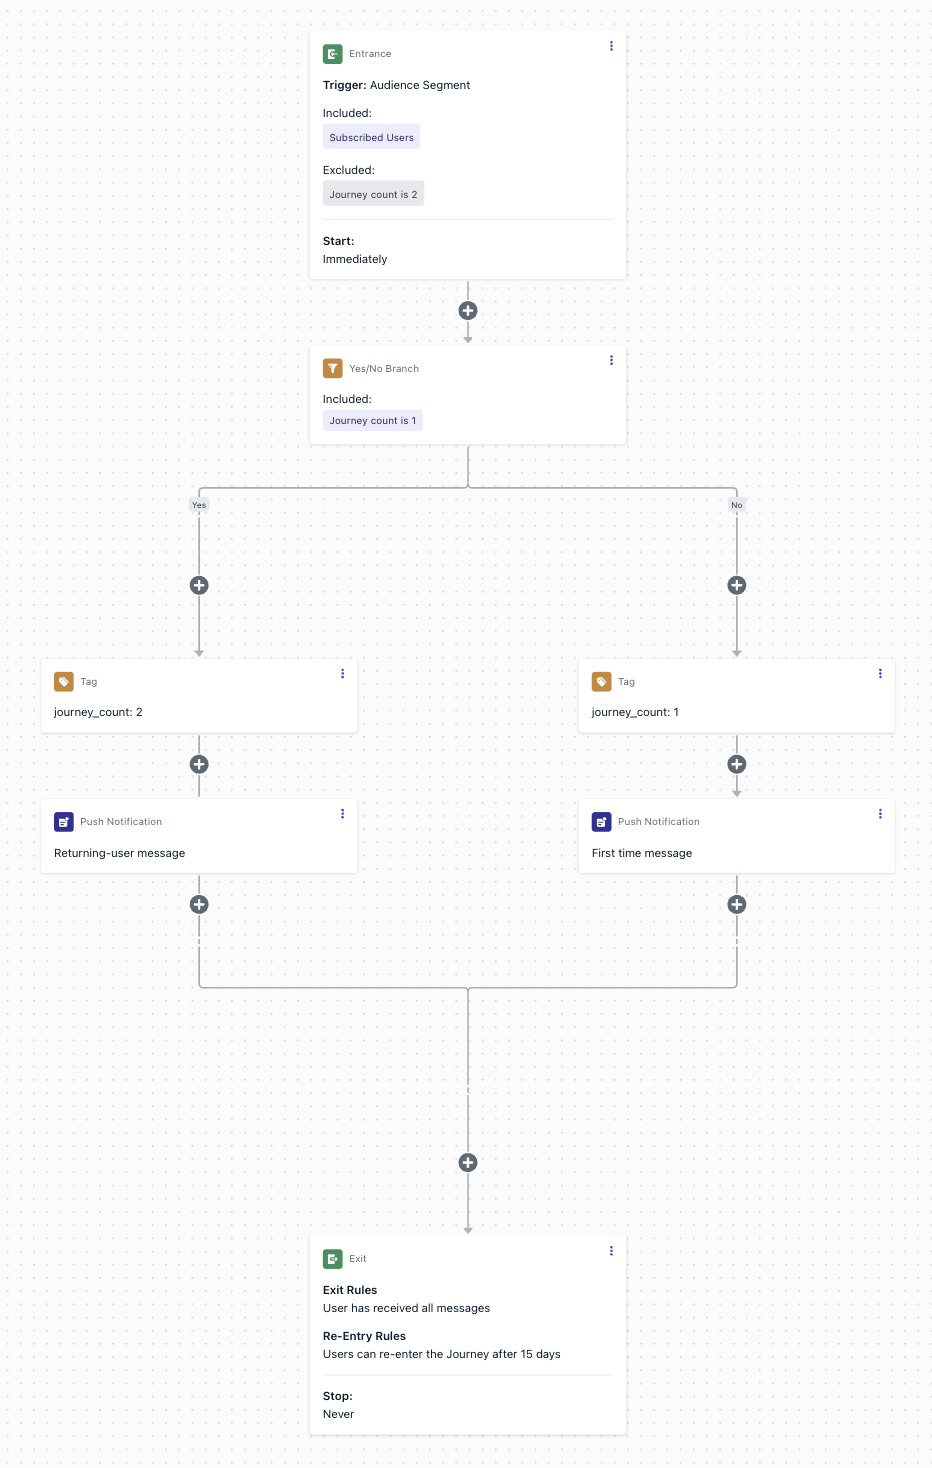
Limited entry flow
Add a yes/no branch at the start
journey_count equals 1.- Yes branch = returning users (second entry).
- No branch = first-time users (no tag present yet).
No branch (first time entry)
- Add tag user action: set
journey_countto1. - Send your first-time messages and actions.
- Continue to end or additional logic as needed.
Yes branch (second time entry)
- Add tag user action: set
journey_countto2. - Send your returning-user messages and actions.
- Continue to end or additional logic as needed.
Enforce the limit
journey_count = 2, any attempted third entry will be blocked automatically.Recurring journeys for specific days
Send recurring messages that align with a specific day of the week (e.g., weekly promotions, event reminders).| Journey setting | Description |
|---|---|
| Entry rules | User matches the segment criteria (for example, subscribed users or another relevant target segment). |
| Audience | Include your target segment. |
| Exit rules | They moved through the entire journey. |
| Re-entry rules | Yes, after a certain amount of time: 7 days. |
| Content | A weekly message sent on a specific day (e.g., every Friday). |
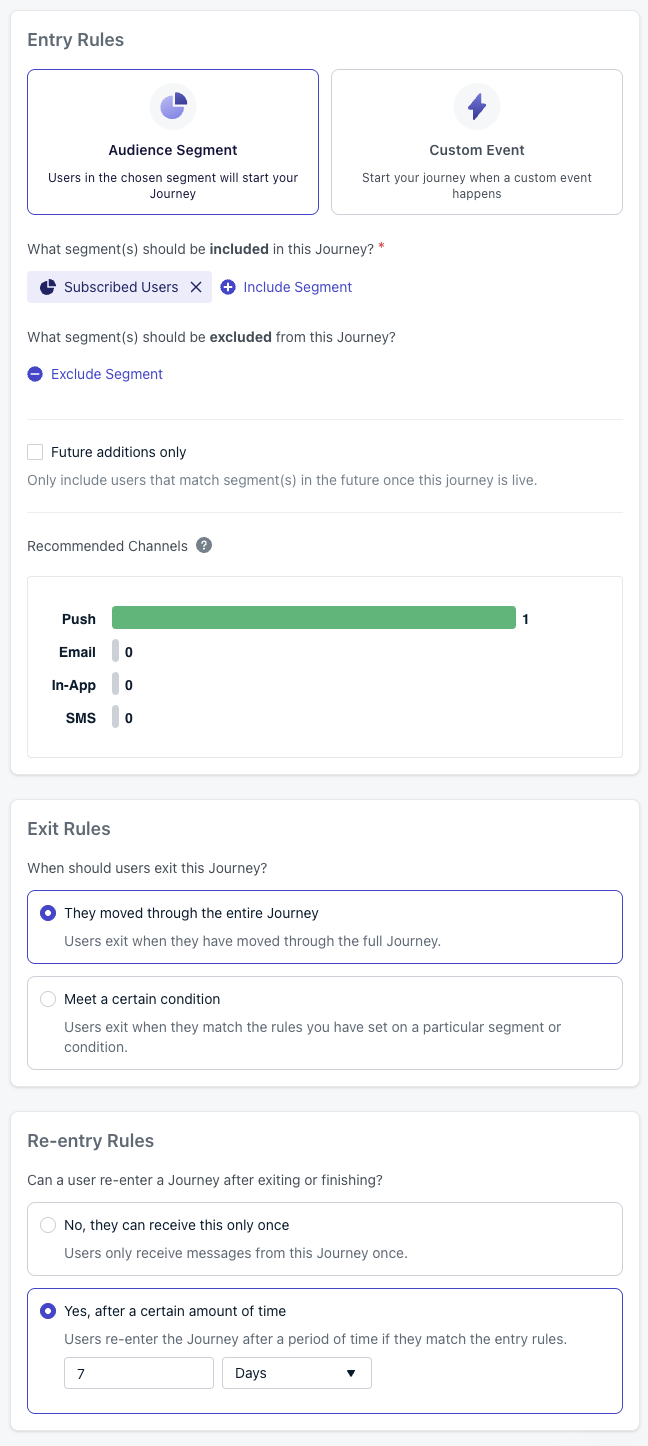
Recurring journey settings
Initial setup
Configure audience
Set re-entry rules
Journey steps
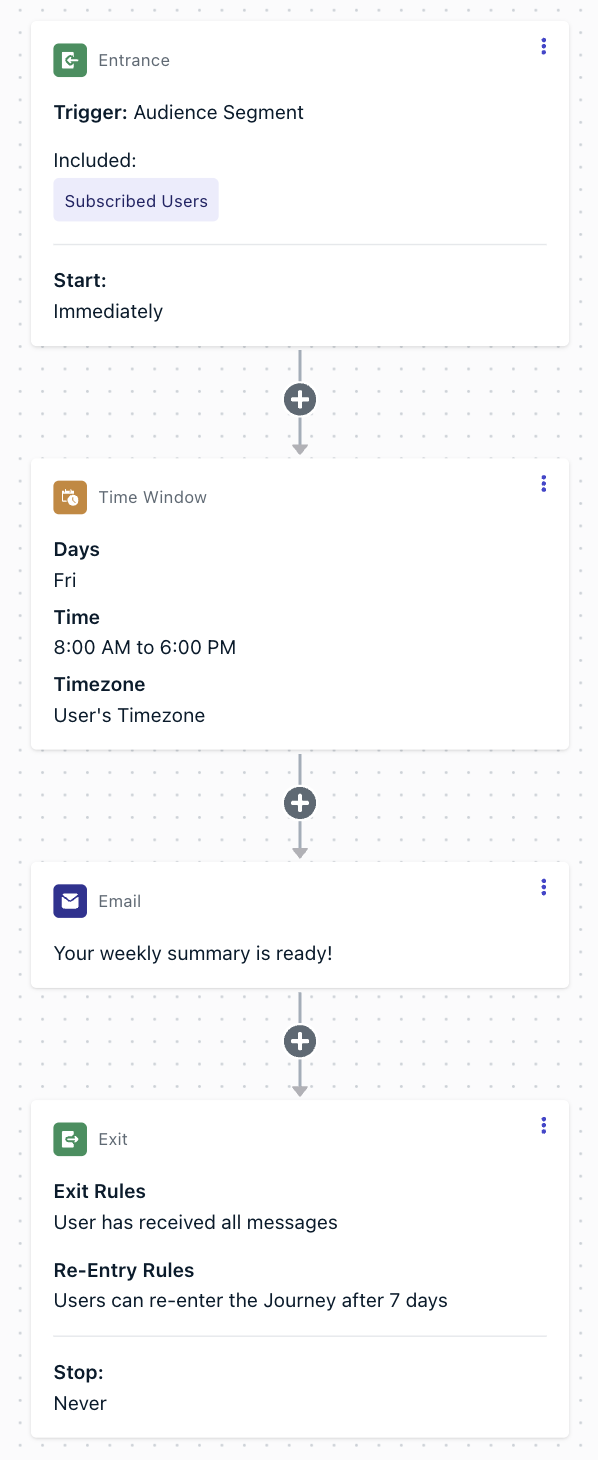
Recurring journey flow
Add a time window node (first step)
Users entering the journey will wait until the next matching day.
Add your message after the time window
End the journey
Progressive journeys (event-driven)
Escalate engagement depending on user progression, monitored with wait until conditions on custom events.| Journey setting | Description |
|---|---|
| Entry rules | Custom Event = Progression_Level, with filter progression_level = 0. |
| Audience | Optional segment filter. You can run this for all users or restrict to a subset; no tags required. |
| Exit rules | - They moved through the entire journey. - Or when maximum progression level is reached (e.g., progression_level = 3).- Optionally: exit when a Wait Until node expires. - Optionally: branch from a Wait Until node to tag users who do not complete the event, leading them into a re-engagement journey. |
| Re-entry rules | No |
| Content | Stage-based messages that escalate as users complete milestones (emails in this example). |
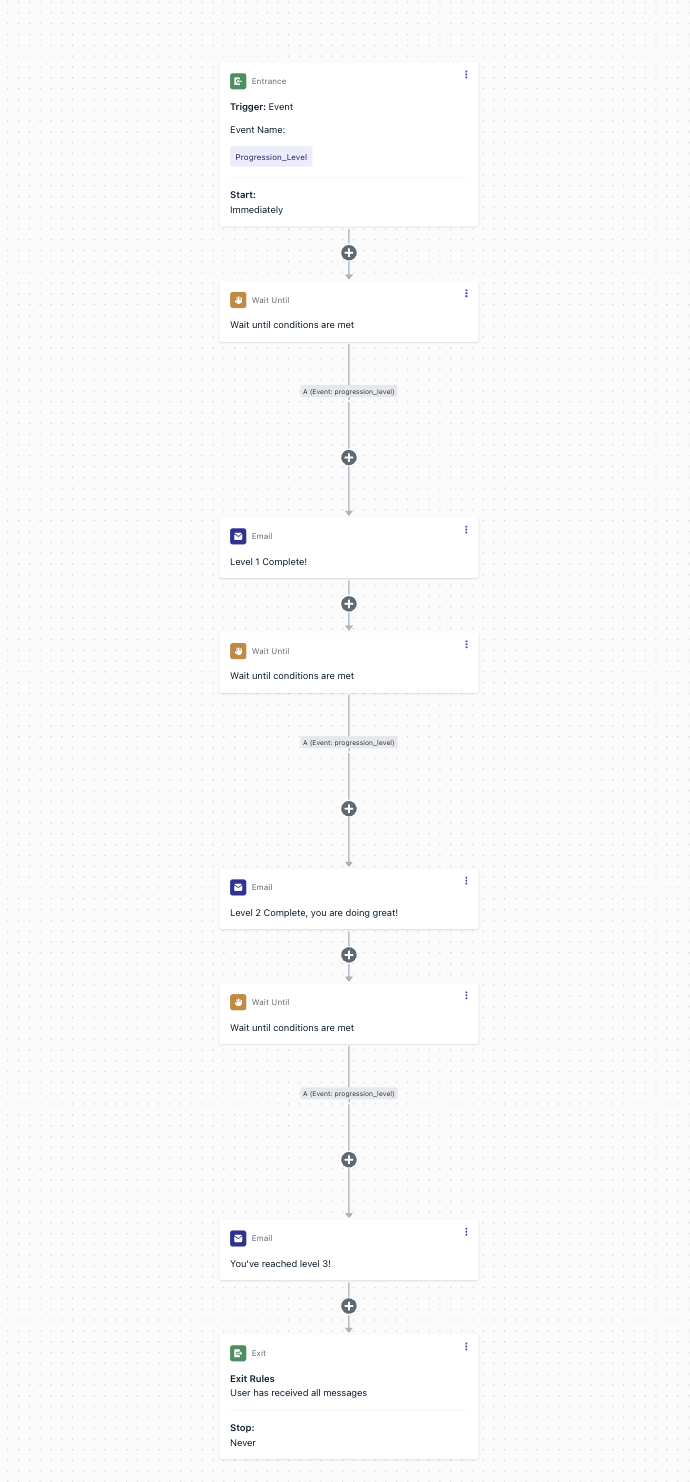
Progression journey flow
Journey steps
User enters the journey
Trigger: Custom Event
Progression_Level with progression_level = 0.Start: Immediately.
Level 1
- Wait until custom event
Progression_Leveloccurs withprogression_level = 1. - Send: Level 1 Complete! message.
- (Optional) Apply expiration on the wait node → exit user if milestone not reached.
- (Optional) Branch: if expiration hits, tag the user and send them into a re-engagement journey.
Level 2
- Wait until custom event
Progression_Leveloccurs withprogression_level = 2. - Send: Level 2 Complete, you are doing great! message.
- (Optional) Apply expiration or branch/tag to re-engagement.
Level 3
- Wait until custom event
Progression_Leveloccurs withprogression_level = 3. - Send: You’ve reached level 3! message.
- (Optional) Apply expiration or branch/tag to re-engagement.
Exit
Optionally, use branch/tag paths to route stalled users into a re-engagement track.
Schedule: Start immediately, Never stops.
Adding expiration and branch/tag logic lets you gracefully handle stalled users — either exiting them or re-routing into a re-engagement journey.